- Waldo usage
You are given two waldos, red and blue. Each waldo can be thought of as a single thread or a single computational process. The game encourages you to use both waldos but it is often simpler to use only one waldo. A simpler machine is likely to be easier to design, use less symbols and be easier to understand and debug. It cuts out a lot of the potential errors (e.g. molecule pull-apart, out-of-sync issues). It can also do less, so it is only applicable when the solution has simple design parts. Even up to the last level you can solve certain reactors with a single waldo.
Using only waldo is certainly restrictive. If you really want to optimise for cycles, using two waldos whenever possible can sometimes double your machine efficiency. At other times, two waldos are simply required due to the limited number of reactors forcing a certain level of design complexity.
When using two waldos, a number of common designs appear frequently. They're a lot like programming design patterns but I'll just call them paradigms. Here is a list of common double-waldo paradigms.
- Parked waldo
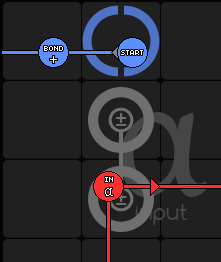
If one waldo is not given a track, it will hit a wall. If its resting place contains a command (other than Start), it will cause this command to be called every cycle. This is useful for Bond+, Bond-, Fuse and occasionally Output. It is totally useless for Input (definitely going to cause a crash) and Sync (makes sync commands do nothing for the other waldo) and... Pause, I guess? Unless you like slow gameplay.
- Exclusive waldos
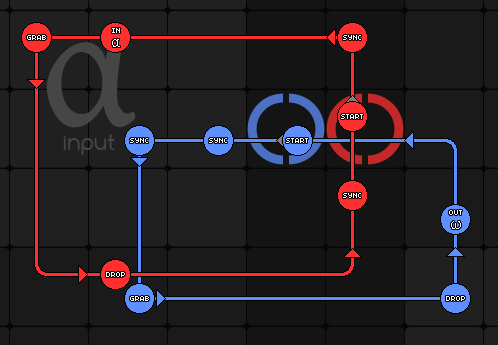
If each waldo has two sync commands on its track, they can be made to run asynchronously. This is easily achieved by placing a Sync directly before and after the red Start command, and placing two Syncs directly after the blue Start command. This effectively doubles your working space and complexity and avoids any syncing issues. The only downside is you do not get the speed benefit of using both waldos to their maximum. It's slow but steady.
- Control thread
Sometimes it is useful for one waldo to perform a simple action repeatedly and have the other waldo perform a sequence of different actions every time the first waldo loops. There are many uses, the most obvious being counting up a number of loops. If the red waldo needs to perform three loops before a Bond+ and Output command are called, this might fit well:
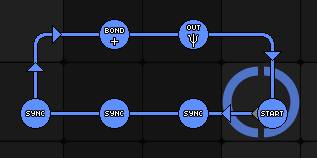
By placing enough Sync commands, you can count to the nth loop very easily which is excellent for fusing.
- Production line
This is shown in the in-game tutorial. Essentially the red and the blue waldo use Sync commands to align spatially and then both work on bonding, unbonding or fusing at atom at the same time.
- Pass across
If you have a single waldo track that you want to double the efficiency of, you can let each waldo do half the work. A good example is a sorting reactor which takes one input and uses a sensor to send it to one of two outputs. The red waldo could do this all by itself, but it's faster to make the red waldo collect the input and drop it in the middle, near the sensor. The blue waldo then grabs the atom and sorts it to an output. If the positioning is just right, the two waldos can sort the atoms with double the efficiency of just one waldo.
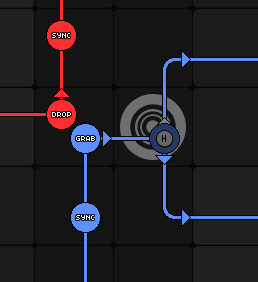
You can alternatively make both waldos perform the same task by giving them duplicate tracks. Unless you are on a research mission you will need to insert Syncs so they don't crash in to each other, and in this case you should note this sort of design has more issues with syncing and collisions than a pass across method is likely to have. It is better to give each waldo a distinct task.
- Complex design
Of course, there is no limit to the number of crazy and interesting designs you can make with both waldos.
- Parked waldo
- Inputs and Outputs
Inputs and Outputs are pretty crucial. There are some interesting behaviours with regards to how they work that can greatly benefit a simple design.
- Input and Output block completely. That means if your output pipe is full, you will cause your waldo to block until the receiving reactor takes an input. Try to place Inputs and Outputs before Syncs rather than after them.
- Inputs appear in the place where the molecule was output from in the previous reactor. That means often you can expect an atom/molecule in a specific place.
- Likewise, calling Output will send that molecule in the position you drop it. Try to keep it neat.
- Either waldo can input or output any area, just right click on the command to choose what you specifically want.
- If you call Output and there are multiple, separate molecules or atoms in the output area, they will get output one by one and the waldo will block until they have all disappeared. This is surprisingly useful.
- A molecule that is held by a waldo cannot be output and the command will not block.
- A molecule that is not completely on the output area will not be output and the command will not block.
- Output commands will do nothing if there are no molecules in the output area.
- Input and Output comands will not block in research levels where you are only working in the confines of one reactor. There is one exception, an output command will block for a cycle for every additional molecule that is placed on the output area. So if two molecules are placed on the output area, it will block for one cycle.
- Input and Output block completely. That means if your output pipe is full, you will cause your waldo to block until the receiving reactor takes an input. Try to place Inputs and Outputs before Syncs rather than after them.
- Grab and Drop
The Grab and Drop and GrabDrop commands allow the waldos to move the atoms around. I recommend specifying Grab or Drop and using GrabDrop only when you have to, as it's much clearer to read. Once again, Grab will do nothing if there is no atom at that position or if you already have the atom grabbed. Drop will do nothing if you have nothing grabbed. GrabDrop will do nothing in either of these cases as well.
If you receive atoms in to an input area but they come through in various positions, what you can do is place a Grab in each position and get the waldo to run over all of them.
- Rotate
The common usage for rotation is to bond atoms on each side of another atom, usually using a control thread waldo or FlipFlop sequence to make sure it is done the right number of times.
Rotation is useful for optimising final outputs. When your target molecule is complete and being sent to count towards your goal, it doesn't matter what orientation or position it is in. So you might as well stuff it in to the output area in the nearest place and go back to build another one. A rotation is quicker than moving back and forth a square in the following example:
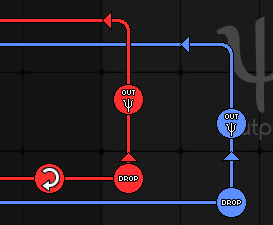
To rotate a molecule takes precisely one cycle. If no molecule is grabbed, it does nothing and takes no time.
- Sync
The Sync command is both good and bad. If you have a half-working solution and you find yourself placing Syncs down to try to stop collisions, you are probably in a bad situation. Syncs work best when placed logically and for a reason, not just because the reactor tends to cause a crash near that area.
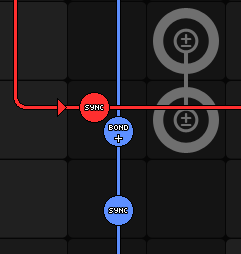
When placing Syncs, there are certain advantages to placing them in certain areas. It can be advantageous to place two Sync commands whilst an atom is being moved over a bonding tile. The other waldo can then create double or triple bonds without the first waldo having to drop the atom on the bonder and pick it up again later.
After both waldos hit their respective Sync commands, they will proceed onwards at the same rate until one of them is potentially blocked by a input or output command. That means you can position Syncs so that the waldos remain aligned chronologically for large parts of a track. This allows you to make one waldo call a command relevent to the other waldo's position, for example Bond+, because you know with certainty that both waldos will be at the correct places at the same time.
- Bonding
A lot of people miss this with the Bond+ and Bond- commands: You can place them anywhere on the screen. They do not have to be placed on top of the bonding panels. You can also move the bonding panels whereever you want.
You can gain a large advantage by having the bonding panels directly over the input area so that you can input an atom and have it in a position ready for bonding. Another good place for them is in the output area so that atoms can be bonded or unbonded directly before being output. Or, you can just place them whereever you want.
The red waldo's commands are executed before the blue waldo's, so if they perform a Bond+ and Bond- simultaneously, they are done in red-blue order.
Bonding past max bonds is not possible but it does not cause a problem either. This can be used advantageously. If you have hydrogen atoms (max bonds: 1) bonded to the correct atoms, no amount of Bond+ will affect them, even if they are on the bonder plates next to different atoms. Similarly Bond- does not cause a problem if there are unbonded atoms on the bonder plates.
- Sensing
You can use the sensor system to detect different atoms. You do not have to place the detection command on the sensor, you can place it anywhere. It will only detect the atom on the sensor plate. The atom can be held by a waldo.
Remember you can right click on the sensor command to change the trigger element and the direction it sends the waldo.
- Fusing
Fusing increases the atomic number of an atom to the sum of the two atoms on the fuser plate. There is no way of splitting the atoms down again so try to calculate what numbers you are going for. The game has a useful periodic table for reference.
Similar to the bonder plates, you can move the fuser plate whereever you want. A good position is in the input area, as that prevents the need to place atoms on it before calling Fuse.
Some odd behaviours:
- If you fuse an atom to an empty space, nothing happens. This is a little frustrating because it prevents you from dumping the fusing panel in the input area and spamming Input and Fuse commands.
- You cannot fuse past the end of the game's periodic table. Nothing happens if this is attempted. There is no crash but both atoms remain on the fuser plate.
- You cannot fuse the special elements in any way.
- You are perfectly free to fuse bonded atoms. The atom which is destroyed in the fusing has all its bonds removed. The new atom's bonds are not broken when fusing unless the new atom has more bonds than its max bonds, in which case some bonds disappear (the order appears to be random). This commonly happens when going through the noble gases (helium, etc.) which have zero max bonds.
- If you fuse an atom to an empty space, nothing happens. This is a little frustrating because it prevents you from dumping the fusing panel in the input area and spamming Input and Fuse commands.
- Controls
During defense assignments, you are granted access to the control commands. There are four, called A, B, C, D. they are toggled with the mouse or with the F1-F4 keys. When they are active, they will redirect the waldos.
For the later defense missions, it is useful to build edge-detection traps for the waldos. See common structures for details.
- Flip flops
Flip flops are extremely useful. They allow you to redirect the waldos and make many interesting track shapes. They allow you to backtrack the waldos. They also allow you to build binary counters so you don't have to count using Sync commands. See the section on common structures for more information on how they can be used.


Although all the tools in SpaceChem are explained and apparent, there are many interesting ways they can be used in reactor design. People say that a bad workman blames his tools. If that is true, then surely a good workman becomes friends with his tools, discovers their true nature and thanks his tools. I don't know what any of that meant.